
ULTRASTAR 36ZX - Disque dur HITACHI - Notice d'utilisation et mode d'emploi gratuit
Retrouvez gratuitement la notice de l'appareil ULTRASTAR 36ZX HITACHI au format PDF.

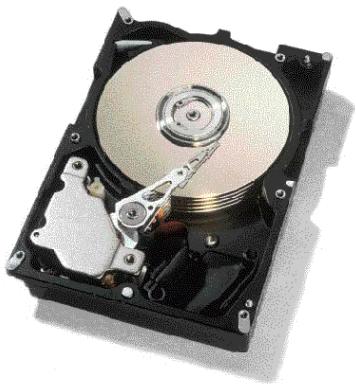
| Type de produit | Disque dur interne SCSI |
| Marque | HITACHI (anciennement IBM) |
| Modèle | ULTRASTAR 36ZX |
| Capacité disponible | 9 Go, 18 Go, 36 Go selon le modèle (DMVS-09, DMVS-18, DMVS-36) |
| Interface | SCSI multimode SE/LVD |
| Vitesse de rotation | 10 000 tr/min (estimation pour la gamme Ultrastar 36ZX) |
| Dimensions typiques | 146 x 101,6 x 25,4 mm (format 3,5 pouces) |
| Poids typique | Environ 0,7 kg |
| Alimentation | 5 V et 12 V (connecteur d'alimentation standard) |
| Consommation électrique typique | Moins de 10 W en fonctionnement |
| Fonctions principales | Stockage de données, interface SCSI, adressage par cavaliers |
| Entretien et nettoyage | Ne pas ouvrir le lecteur ni toucher les circuits imprimés ; conserver dans son sac antistatique lorsque non utilisé |
| Précautions de sécurité | Décharger l'électricité statique avant manipulation ; ne pas couvrir le trou de respiration ; manipuler avec soin pour éviter les chocs |
| Température de fonctionnement | 5°C à 55°C (estimation) |
| Informations générales | Produit d'IBM/Hitachi ; manuel d'installation rapide ; nécessite sauvegarde des données avant installation |
FOIRE AUX QUESTIONS - ULTRASTAR 36ZX HITACHI
Questions des utilisateurs sur ULTRASTAR 36ZX HITACHI
0 question sur cet appareil. Repondez a celles que vous connaissez ou posez la votre.
Poser une nouvelle question sur cet appareil
Téléchargez la notice de votre Disque dur au format PDF gratuitement ! Retrouvez votre notice ULTRASTAR 36ZX - HITACHI et reprennez votre appareil électronique en main. Sur cette page sont publiés tous les documents nécessaires à l'utilisation de votre appareil ULTRASTAR 36ZX de la marque HITACHI.
MODE D'EMPLOI ULTRASTAR 36ZX HITACHI
Quick installation guide
Ultrastar 36ZX & 18LZX
Multimode SE/LVD
Models: DMVS-09
DMVS-18
DMVS-36
Handling precautions
- Do not open the ESD (electro-static discharge) bag containing the drive until required.
- Do not apply pressure on the drive during handling or installation.
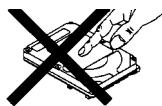
Always handle the drive with care to prevent damage from shock, vibration, or electrostatic discharge.
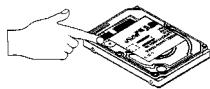
- Handle the drive carefully by the edges. Do not touch any exposed printed circuit board.
- Do not cover the breather hole! Covering the breather hole may result in loss of data.
- Save the packaging materials including the ESD bag in the event that the drive must be returned.
- Record the serial number and part number of your IBM Desktop for future reference.
Installing the drive
- Backup all data before proceeding with the installation.
- Turn off the computer.
-
Open the case as directed by your computer system manual.
-
Discharge the static electricity from the package and from your body. With one hand touch an unpainted metal surface on your computer chassis, then touch the ESD bag with the other hand for at least 2 seconds.
- Unplug the power cord.
- Remove the drive from the ESD bag. When not handling it, place it on the bag. The bag provides a static-protective surface to lay the drive on prior to chassis mounting.
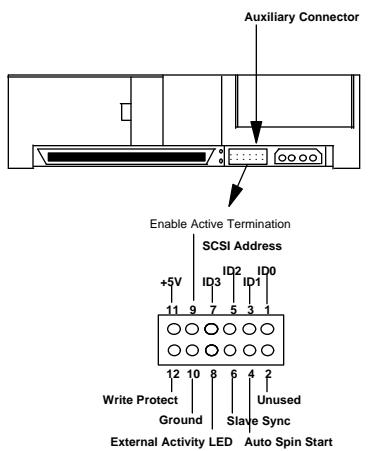
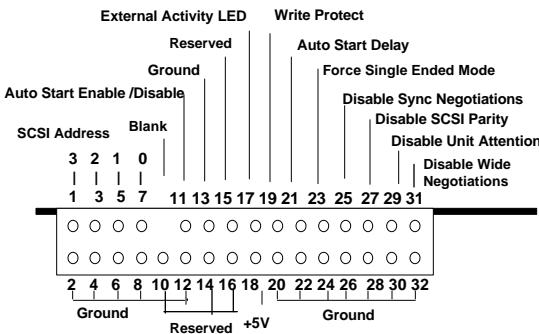
- Set the address, Each drive on the SCSI bus must have a unique address. SCSI address bits 3,2,1, and 0 of the Option Jumper Block are used to select the SCSI device ID.
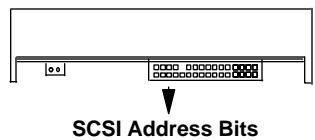
| 3210 | 3210 | ||
| □□□□ | address 0 | □□□□ | address 8 |
| □□□□ | □□□□ | ||
| □□□□ | address 1 | □□□□ | address 9 |
| □□□□ | address 2 | □□□□ | address 1 |
| □□□□ | □□□□ | ||
| □□□□ | address 3 | □□□□ | address 1 |
| □□□□ | □□□□ | ||
| □□□□ | address 4 | □□□□ | address 1 |
| □□□□ | address 5 | □□□□ | address 1 |
| □□□□ | address 6 | □□□□ | address 1 |
| □□□□ | □□□□ | ||
| □□□□ | address 7 | □□□□ | address 1 |
The Auxiliary Option Block connector depicted below is used in external cases with standardized external switch connectors.
-
Remove the drive from the ESD bag.
-
If the drive is the only device on the SCSI cable, attach it to the end of the cable furthest from the controller. (The using system is responsible for making sure that all required signals are terminated at both ends of the cable.)
- Select the other option jumpers as required by your computer.
- Attach the power connector.
- Mount the drive securely in any axes, using the appropriate brackets or rails. Use four 6-32 UNC metric screws in the bottom or side mounting holes. The maximum screw insertion depth for mounting is 4.0mm (0.157 in.).
- If your system boots up, replace the cover.
- If your system does not boot up, recheck all settings. If the system still fails to boot up, remove the new drive to return the system to its original configuration and call the IBM Hard Disk Drive Technical Support Center
Partitioning and formatting (using DOS 5.0 or later)
Caution: Partitioning and formatting will erase all data.
- Insert the OS setup diskette into the floppy drive.
- Turn on the computer.
- At the DOS prompt type FDISK, press [ENTER], and follow the instructions on the screen.
- To format the primary system drive, type FORMAT C:/S at the DOS command prompt and press [ENTER]. The /S parameter makes C: the operating system startup drive.
- To format a second drive (not C:), type FORMAT X: (where X is the drive letter assigned by FDISK) at the DOS prompt and press [ENTER].
- Remove the diskette and restart your computer. The installation is complete.
- Install the operations system.

© International Business Machines Corporation 1999
www.ibm.com/harddrive
IBM Hard Disk Drive Technical Support Center
Dept. WCN
3605 Highway 52 North
Rochester, MN 55901
Telephone: 888.IBM.5214 or 507.286.5825
Fax: 507.253.DRIVE
E-mail: drive@us.ibm.com
Singapore Technical Support Center
Telephone: 1800.418.9595 or 65.6.418.9595
E-mail: drive@sg.ibm.com
IBM Systems Storage Division
5600 Cottle Road
San Jose, CA 95193
www.ibm.com/storage
Printed in the United States of America
6-99
All Rights Reserved
IBM is the registered trademark of International Business Machines Corporation.
Other company, product, and service names may be trademarks or service marks of others.
Produced by the IBM Hard Disk Drive Technical Support Center.
IBM Ultrastar 36ZX and 18LZX Hardware/Functional Specification, version 1.90
Product Description data represents IBM's design objectives and is provided for comparative purposes; actual results may vary based on a variety of factors. This product data does not constitute a warranty. Questions regarding IBM's warranty terms or methodology used to derive this data should be referred to the IBM Hard Disk Drive Technical Support Center. Data subject to change without notice.
Date: 21 October, 1999


Marque : HITACHI
Modèle : ULTRASTAR 36ZX
Catégorie : Disque dur